Now I want to use my images and put them onto plains in 3dmax. Firstly I opened up 3dMax, saved a page and created a plain.
To make the material that will hold the photos , I typed M this is a short cut to the material editor. I selected a material slot and assigned it to diffuse channel, I selected a bitmap and then selected my file with both photos on. I opened this in a photoshop file, and collapsed all the layers.
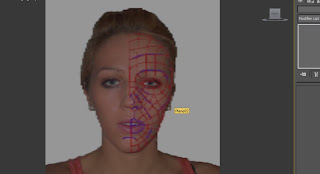
Once I got the image on a plain, I needed to position it correctly. I selected UVW and then bitmap fit from the modifier panel. I then selected Gizmo. This enabled me to move the image to exactly where I wanted it. Once the front image was perfectly centred, I then made sure that there was no shading on the image, otherwise when it is looked at at a different angle it may appear different. I went into the material editor and made sure that it was set to parent level I would remove any lighting's which there weren't anyway. I selected 100% self illumination, to see it wherever it is.
Now that the first image has been put onto a plain , the second one is easier. We have the exact size of the plain and image , so we can just copy it. This was done by selecting Clone, and then copy, It can then be modified. By pressing A on the keyboard it can help us to rotate the plain. It rotates in increments of 5. Once its rotated to 90- degrees, we can set it into place. You can check at what degrees it is at by looking at the bottom. Now the gizmo tool should also be set to this plain as it was copied, you can now move the image using the gizmo tool to put the side view on the second plain. I the froze both plains by right clicking and selecting freeze to each plain.
No comments:
Post a Comment