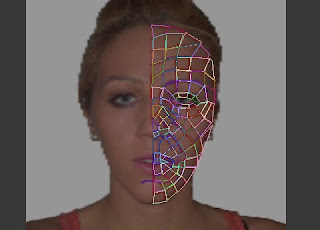
Now that I have my photos in position I am going to start to create my face. I will follow my quads as guidelines in create my face. I selected the line tool, and made sure the settings were set to smooth / corner, as i didn't want it to try and create rounded corners but I wanted sharpness.
I brought the front view of my face into view and selected the line tool. At the top bar there is a button for 3dsnap. This enables you to create quads easily by noticing vertex around, you can change the settings for this by right clicking on it. At the moment I left them how they were. I then began copying the quads that were on the front view of my face and tried to recreate them using the line tool. This was very time consuming and I had to make sure that they were connecting with the other quads other wise this would have caused me problems.
It did cause me problems as I completed the face and when I tried to do the next few steps it wouldn't allow me to, as my quads were not connected right. This made me realise that the topology and making sure it is connected well, and flowed was the most important part of creating the face.
Snap Toggle
I kept making sure that the snap was turned on so that when you reach existing spline it will snap to it. This was really important, and I noticed a few times my snap had turned itself off. This caused a few problems for me. . This saved me a lot of time in the long run. I did this over the entire front view surface. Area around eye, nose and mouth, these are all the important areas. By using the Back space on keyboard it removed the last vertex so if mistakes were made I could easily fix them . I did however have a few problems when using the snap toggle. Sometimes It would not select a vertex I wanted it to join, it was as if it didn't see it. This was because of the settings. the snap type could be changed by going to the options and adjusting the radius. In my case it wasn't sensitive enough so I changed the the number of pixels so it was better suited to me. When I next tried to snap the vertex together, it was much easier.

Once I had created the face in quads, I attached them all together. I did this by selecting in the properties of the vertex, attach, there was a button next to the attach button which meant attach many, I selected this and it showed me all the individual quads I had created in list. I selected "attach all" and then they all became together.
Weld tool
Even though they are attached, they were only recognised as the same thing, they were not actually connected. So to connect them together I had to use the weld tool. The weld tool was in the vertex properties. I selected my attached quads, and then selected weld. A box then appeared which showed the number of vertices's, before and after and the weld threshold. The weld threshold was at 0. I increased the threshold to 2 and then pressed okay, I wanted to see if they were all now attached, some of them were but not all of them. I played with the threshold until all my vertex were now attached. However a problem I found was that If you turned the threshold up too high, the quads began to turn into triangles. So I had to be careful and find the exact number before this happened.
No comments:
Post a Comment