Friday 23 October 2009

My summery and final head


Unfortunately I didnt get to add my skin or more to my face, as I found fixing all the problems that happened to me took up most of my time. I really enjoyed modelling my face, and with more practice think this wouldn't have taken me so long. my main problems which caused me to have to go back and re do alot of work were:

I did try to create the eye balls, by using a sphere, squishing it to an eye shape, using a bitmap image of an eye and putting it behind the face, however I remove dit as I was getting ahead of myself and hadn't even finished my head.


problem 1: Orthographic view - this view caused all sorts of problems, If i would be working on a view and I changed it slightly, this would change to orthographic view, and sometimes without me knowing i would change something in the view port, and in the other ones, it would go terribly wrong. this happened many many times which meant if i hadn't realised, progressed and saved my work when using this view port I had to start again.
solution : I realised though, that if I would have always had the four view ports up then I could have seen the problem as it was happening. This would have saved me some time.

Problem 2 : another problem I had many times which used alot of my time up was when I would edit the the one side of the face sometimes, I dont know why, when I tried to put the symmetry back on it wouldn't appear the same, and because I didnt check it would be saved and any work I did would be lost.

Problem 3 : The ear- No matter what I do I just couldn't get the ear to look right, I dont know why, but because I spent most of my time on the ear, I didnt get to do the rest of the face.

I was gutted I didnt get to finish my head in time as I loved doing it. It was much more time consuming and fiddly then I thought yet I learnt a lot of new tools and interesting stuff. I would love to continue this and animate this. I can imagine if I had of finished it, there wouldn't ever be an end as there is more and more I could do to make it look more like me.

I dont know whether this was a factor however I used the latest version of Autodesk 3dsMax, and this could of caused complications for me, and even though it was very similar, I didnt like the new layout, and it wasn't very easy to find tools.

Overall I thought the module was a great one. Even though I didnt get as far as I would have wanted, I still feel that I learnt all important useful tools, and I know now how characters of computer games etc are made, and I'm thrilled. I just wish I had alot more time to have imported my skin, and made it perfect.

Adding the ear to the head.

This was so difficult for me to do, and took a very long time. I now had to add my ear onto the head, by adding vertices's or joining them up.


Firstly I turned symmetry off as I didn't want it to show and then I got rid of the polygons in the head where the ear would go.


Because there were many quads that were small in the ear, I had to turn them into quads with less vertices's so that I could fix it together like a puzzle.The image above shows me trying to target weld the ear on the left, and the image to the right was the view through the other side of the head which helped me to do this.


When i finally did this after many hours of messing with it, my ear certainly looked different. I didn't think it looked human, so I spent a Long time trying to fix it.


I wasn't happy at all once I created my ear as everything I did it didn't look right. Time was running for me, and I had many other problems with my face that I had to fix, so I Left my ear as it was.

Creating the ear

This was probably the hardest and most time consuming process for me, as everything seemed to go wrong for me. What I thought was a human like head, now after playing around with everything so much didn't look like a human at all. I spent hours and hours trying to re match the vertices's on the right view and front view.

Problem: I don't know why, but every time I selected vertex, once the object was selected, it would flip to edge most of the time. I don't know why this happened but it caused hell for me when trying do a fiddly thing like the ear.


To create the ear it was basically just like the rest, the face and head etc. I loaded the reference image, and defined the key areas.I started drawing in the topology, same idea as before, connecting the lines, and making new ones , quads.

The ear was so small and fiddly, and was hard to work out what should go where.

Once I had create the ear out of the quads, I did the same as before, converted them to an editable poly, attached them welded them and then, tried to give them depth by using both the front view and right view to pin point the position of the vertices's.


This was alot harder than I thought, and hours later I still hadn't got anywhere, especially with my problem of when trying to move a vertex, it kept switching to edge.


Once the ear looked half like an ear I decided to try and move on and give in some more width, I selected edge and held down alt and brought out the ear , extruded it and then did this again, used the scale button and made it curve behind the ear.


Now this was only the first part. The ear now had to be attached to the head.


Creating the back of the head


To create the back of the head It was basically like the front, I used the guidelines form the photoshop pictures and did the same. I had to define key lines in the neck area;and make sure line are going out through the shoulder.


To make it easier for myself I used a sphere to help me create the shape of my head. I made a sphere and use the geometry to make the back of the head. I shaped the sphere looking in the right view port and made sure it was the same size as my head.


I then deleted the quads that were too small and that I couldn't use. The other bigger quads could be used to make the whole shape of the head. I deleted the quads at the top of my neck as they were not needed, as well as the ones that touched the face I had already created. I Was careful when deleting as I wanted to be able to link the vertex together easily.


Now that I had the shape of my head I turned it into an editable Polly attached it to their face by using the snap tool.


I now needed to create the rest of the back of my head and shoulders, this was very time consuming and difficult I now had to use the guidelines form my photoshop photo to create the rest of the neck and back of head, I did this by extending polygons by holding shift and dragging the polygon, I connected the quads by using target weld, and selecting each of the vertex and dragging them to each other this was the most reliable method of fixing them together.


this was very time consuming and caused many problems for me. The neck was very hard and I ended up redooing it many times..


Problems : I experienced problems when editing the back of the head, as some quads became unattached, so I found myself reattaching lots of quads most of the time, I also tried to re-weld them, and manly snap them.


I had many problems when in Orthographic view, as If I would edit something this view, it often went disastrously wrong in the other fixed views. I tried not to ever work in this view as it caused too many problems.


Making the other side.

Now that I had created a face that I was happy with (not perfectly as I can edit later) I wanted the mirror it so i could see my whole face. I did this by selecting the object I selected mirror from the tool bar, I chose the axis I wanted and then I chose Reference. this was one way communication, the clone mimics the original with changes but you cannot modify the clone. "This way of mirroring applies an inverse scale matrix, so that if the model is merged into another programme the normals could end up becoming inverted, which causes prob, I could have chosen, copy or instance, but reference was suppose to have been the best method of mirroring for me.


Problem 1 :This was my ever first attempt for mirroring. As you can see it went horribly wrong as the vertices weren't attached properly as I hadn't used the snap tool. This means I had to re created my quads again. This showed me how important using the snap tool was.


Once I selected my axes, If it didn't appear on your screen change the axis. It appeared back to front so I pressed Flip face’. If the axis of the object is too close and it looks odd, select the + sign next to symmetry in the stack and it will reveal ‘Mirror’. With"mirror" you can move your clone and orientate it. If you click on ‘Show end result’ which is an image just below "mirror" you can see the changes you are making to the mesh without having to toggle from mirror to edit poly. This is very useful as you don't have to keep going back and forth .


In the properties, at the bottom it asks you if you want to weld the seam. this is and easier way to weld together both sides of the face without having to do it separately. This is just like before, and you have to use the weld threshold to find the right amount of vertices's to weld

giving my face some shape


Now the face is now created I need to use the side view to give the face its proper shape. I laid out the two images one to the back and one to the side. create a corner for the image to sit inside. The quads on the front view are resting on the front view face. This is straight on when looking at the "front layout" but now to do the side of the face I worked in the "side view" "right"


Again I made sure that the face was semi transparent otherwise you would not be able to see the key features and wouldn't know were to match the vertex.


I made sure that both layouts were in view. I did this by right clicking on the view port and selected properties, I then went to layout and I could selected how man y boxes I wanted to view. I chose two and selected front and right. This would make it easier for me .


Now by looking at the image you can see how the face will come together. first of all I selected all the the vertices's on the Y axes that I had created, these should be roughly in a straight line. To make sure this is a straighter line I I went into vertex settings and selected panalar, I then selected y axes and they straightened out. In the right view I was able to see the all the vertex so now all that was left to do was match them up to the side view. I did this line by line.


Firstly I moved all of the vertes to the back of the head of the so the back of the necks were both matched up. I then started from the nose, I selected the tip of the nose on the front view, and then it would highlight which vertices it was on the right view I then dragged this to the image of the top of the nose. I did this with all the first line, follow the chin, mouth nose and forehead. I kept checking looking at both views and occasionally rotating the image to make sure the right vertices's were selected.


Once I Had done the first line I followed by doing the rest of them. This was very time consuming and frustrating but once it was finished I was happy with the result.


In order to smooth your surfaces within editable poly, like the image above, I added a modifier "turbo smooth", this was inthe modifier panel, I can hide this when I am not using it by selecting the image next to the modifier which makes it inactive.


What took me the most time was fixing all the little problems I found once I had created the face. I spent many hours trying to make the face look more human like, and bringing out features such as the nose, lips and eyes. As you can see in the image above, there were problems with these features.

Creating my face

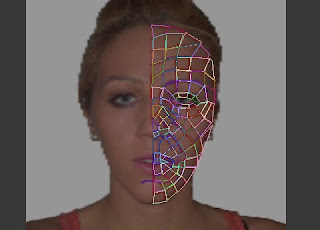
Now that I have my photos in position I am going to start to create my face. I will follow my quads as guidelines in create my face. I selected the line tool, and made sure the settings were set to smooth / corner, as i didn't want it to try and create rounded corners but I wanted sharpness.

I brought the front view of my face into view and selected the line tool. At the top bar there is a button for 3dsnap. This enables you to create quads easily by noticing vertex around, you can change the settings for this by right clicking on it. At the moment I left them how they were. I then began copying the quads that were on the front view of my face and tried to recreate them using the line tool. This was very time consuming and I had to make sure that they were connecting with the other quads other wise this would have caused me problems.

It did cause me problems as I completed the face and when I tried to do the next few steps it wouldn't allow me to, as my quads were not connected right. This made me realise that the topology and making sure it is connected well, and flowed was the most important part of creating the face.

Snap Toggle

I kept making sure that the snap was turned on so that when you reach existing spline it will snap to it. This was really important, and I noticed a few times my snap had turned itself off. This caused a few problems for me. . This saved me a lot of time in the long run. I did this over the entire front view surface. Area around eye, nose and mouth, these are all the important areas. By using the Back space on keyboard it removed the last vertex so if mistakes were made I could easily fix them . I did however have a few problems when using the snap toggle. Sometimes It would not select a vertex I wanted it to join, it was as if it didn't see it. This was because of the settings. the snap type could be changed by going to the options and adjusting the radius. In my case it wasn't sensitive enough so I changed the the number of pixels so it was better suited to me. When I next tried to snap the vertex together, it was much easier.


Once I had created the face in quads, I attached them all together. I did this by selecting in the properties of the vertex, attach, there was a button next to the attach button which meant attach many, I selected this and it showed me all the individual quads I had created in list. I selected "attach all" and then they all became together.

Weld tool

Even though they are attached, they were only recognised as the same thing, they were not actually connected. So to connect them together I had to use the weld tool. The weld tool was in the vertex properties. I selected my attached quads, and then selected weld. A box then appeared which showed the number of vertices's, before and after and the weld threshold. The weld threshold was at 0. I increased the threshold to 2 and then pressed okay, I wanted to see if they were all now attached, some of them were but not all of them. I played with the threshold until all my vertex were now attached. However a problem I found was that If you turned the threshold up too high, the quads began to turn into triangles. So I had to be careful and find the exact number before this happened.